Learn How to draw Kittens Quickly & Easily!
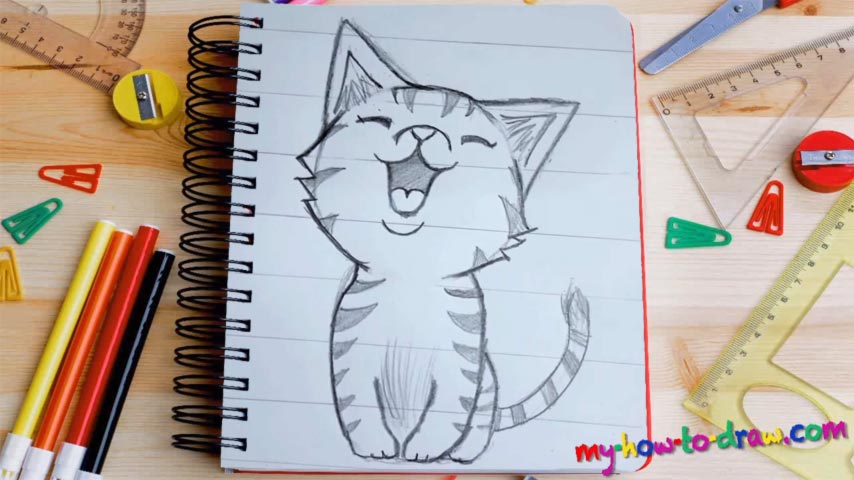
Without a doubt, tiny cats are one of the cutest creatures on planet Earth. And in this post, we’ll learn how to draw Kittens on a piece of paper. There’s nothing fancy about this drawing, and you’ll be able to get awesome results quickly and without any hassle. We begin with the big, round head (00 min 02 sec). Draw an oval/circle in the top corner.
If you’re happy with it, move on to the next stage of this how to draw Kittens tutorial – the body (00 min 16 sec). At this point, our drawing looks a lot like a rough guide for a human, but it’s actually not :). The ears come next (00 min 24 sec). Please keep in mind that the character’s head is tilted a bit, and you should depict that in this composition.
The facial features are the next part (00 min 35 sec). Start with the nose and gradually move on to the mouth. Now, because the eyes are closed, they are just a combination of two tiny curves right above the nose (01 min 07 sec). They’re located pretty close to the top of the head, by the way. Ok, it’s time to make our brute really furry and fluffy (01 min 18 sec).
Simply follow the guidelines in the video and add those curvy shapes all over the place (they look like tiny triangles). Before you move on to the body, don’t forget to paint the mouth, the ears and all those fluffy parts – the cornerstone of this how to draw Kittens tutorial (01 min 44 sec).
Then, go back to the body with a pen and add the same kind of furry details on it (02 min 20 sec). Finally, add that cute tail on the right side (03 min 02 sec). Alright, that’s it for today! As you can see, it’s not that hard to create an adorable can on a piece of paper.
Before you learn how to draw Kittens, did you know?
Kittens are pretty popular in the modern-day world and are slowly taking over the mass media. They’re dominant on social networks and people really like to draw them. If you’re just like that, take the knowledge you acquired from our tutorial and use it to achieve great things with it!